How to Enable Nexus Repository Manager
This guide walks you through how to enable Nexus Repository Manager.
Prerequisites
- SmoothGlue Package
- SmoothGlue IaC Bundle
kubectlconfigured to interact with your cluster
Step 1: Enable Nexus IaC
More details about configuring IaC can be found here.
Enabling the Nexus IaC will provision and configure Nexus Repository Manager for S3 and optionally, RDS.
In the infra env.hcl, enable the nexus module:
locals {
  modules = {
    nexus = true
  }

  nexus_inputs = {
    nexus_pro_version_enabled = true # If you have a license, you can enable this to turn on RDS for Nexus Repository Manager
  }
}
Step 2: Configure SmoothGlue Package
More details about configuring IaC can be found here.
Nexus Repository Manager is disabled by default in SmoothGlue. To enable it, add the following to the Zarf config file:
package:
  deploy:
    set:
      NEXUS_REPOSITORY_MANAGER_ENABLED: true
Step 3 (Optional): Configure License
A Nexus Repository Manager license is required in order to use RDS and single sign-on (SSO). The following is an example of how to provide the license via Big Bang secret values:
addons:
  nexusRepositoryManager:
    license_key: <base64-encoded contents of license file>
Step 4: Log in to Nexus Repository Manager
The initial admin password is available in a Kubernetes secret in the nexus-repository-manager namespace. Kubernetes secrets are base64 encoded, so the password can be retrieved with the following command:
kubectl get secret nexus-repository-manager-secret -n nexus-repository-manager --template='{{index .data "admin.password" | base64decode }}'
The URL to Nexus Repository Manager can be found in the Virtual Services in the nexus-repository-manager namespace.
Running the command kubectl get virtualservice -n nexus-repository-manager should return something similar to:
NAME                       GATEWAYS                  HOSTS                           AGE
nexus-repository-manager   ["istio-system/public"]   ["nexus.10-32-19-210.nip.io"]   174m
Be sure to prepend the host with https://.
When visiting the URL, you can log in with the admin user and the password retrieved above.
Upon first login, you will be prompted to change the password and update some initial settings. It is highly recommended to disable anonymous access when prompted.
Step 5: Locating S3 Blob Store and Repository
While logged in as an admin, go to the admin panel by clicking the gear icon at the top of the page. From here, the blob store and repository settings can be viewed. There should be a blob store of type S3 and a repository configured to use the blob store.
Step 6: Enable SSO Functionality with Keycloak for Nexus (Optional)
If desired, Nexus Repository Manager can be configured to use SSO with Keycloak. The steps are as follows:
-
Within the Sonatype instructions, follow section, "Download Keycloak IdP Metadata".
-
If using Keycloak to configure users and groups, proceed to the next section entitled "Configure Users and Groups". If using Console to configure users and groups, skip this section.
-
Next, configure NXRM in the Nexus values.yaml file, using the following example:
realms:
  - "NexusAuthenticatingRealm"
  - "NexusAuthorizingRealm"
  - "SamlRealm"
sso:
  enabled: true
  idp_data:
    entityId: "{{ base_url }}/service/rest/v1/security/saml/metadata"
    usernameAttribute: "username"
    firstNameAttribute: "firstName"
    lastNameAttribute: "lastName"
    emailAttribute: "email"
    groupsAttribute: "groups"
    validateResponseSignature: true
    validateAssertionSignature: true
    idpMetadata: 'string'
  role:
    id: "/_structsureAdmins"
    name: "Platform Administrators"
    description: "SmoothGlue Console Platform Administrators"
    privileges:
      - "nx-all"
    roles:
      - "nx-admin"
license_key: '{license key string}' -
Modify the above code snippet as necessary:
a. The
usernameAttribute,firstNameAttribute,lastNameAttribute,emailAttribute, andgroupsAttributefields may be customized if desired, but ensure that the values here match the mappers you configure for your client's scopes below.b. Within the Sonatype instructions, "Download Keycloak IdP Metadata” step, you obtained an XML file of the Keycloak IDP metadata; this file should be placed into the "idpMetadata" field (referenced above) as one single-line string, with single quotes and no newline characters.
c. Enter your NXRM Pro version license key into the yaml file; instructions are included in this documentation under the "nexusRepositoryManager" section.
d. The
/_structsureAdminsgroup referenced in thesso.role.idfield will include all users configured as SmoothGlue Platform Administrators in SmoothGlue Console. If desired, another group can be chosen as the administrator group. -
Once NXRM is configured, create client configs and attribute mappings in Keycloak as follows:
a. To import the Nexus Repository 3 Pro or Sonatype IQ Server SAML metadata into Keycloak, via the Keycloak Admin Console, select "Clients" from the left-side menu, then click "Import Client".
b. On the "Import Client" screen, click "Select file" from the Import field, upload the Nexus Repository 3 Pro or Sonatype IQ Server SAML metadata obtained when configuring the Nexus Repository and/or Sonatype IQ Server, and click "Save".
c. After saving, the "General Settings" screen will display. Make sure that the "Client SAML Endpoint" field contains the Nexus instance's Assertion Consumer Service (ACS) URL (i.e.,
NXRMBaseURL/samlfor Nexus Repository 3 Pro orIQBaseURL/samlfor Sonatype IQ Server).d. Ensure that the toggles for "Sign documents" and "Sign assertions" are set to "On". Then click "Save".
-
Next, an attribute for each of the mappable fields configured in the yaml file (i.e., username, firstName, lastName, email, and groups) will need to be created using the following steps:
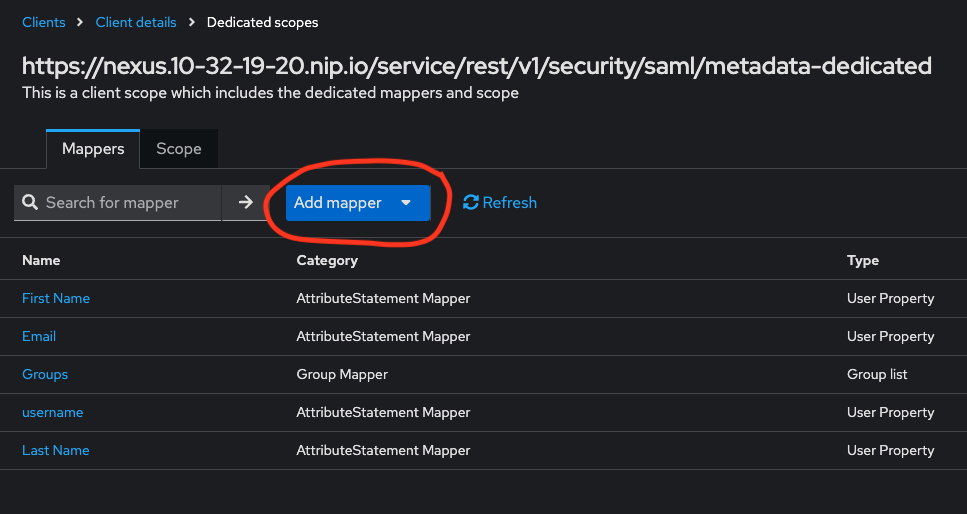
a. Go to "Client -> Client Details -> Client Scopes". Once on the "Client Scopes" tab, click the name of the client scope itself, as shown in this screenshot:
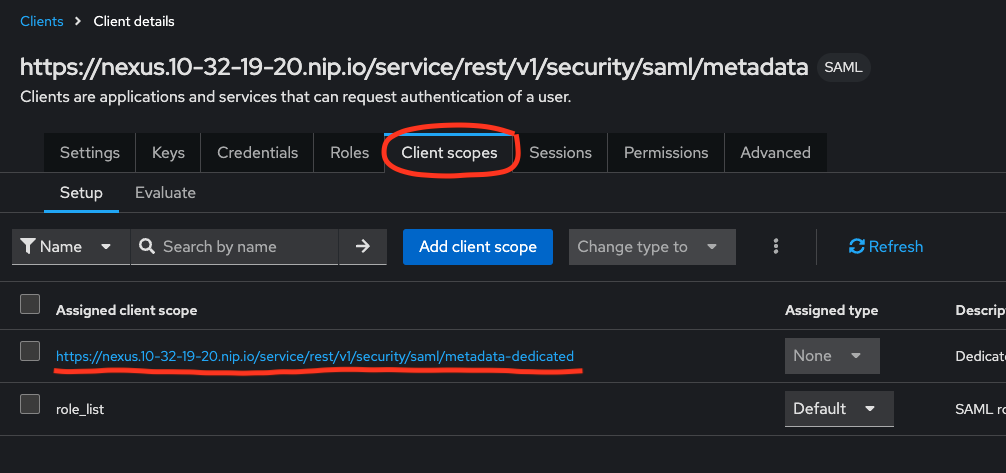 .
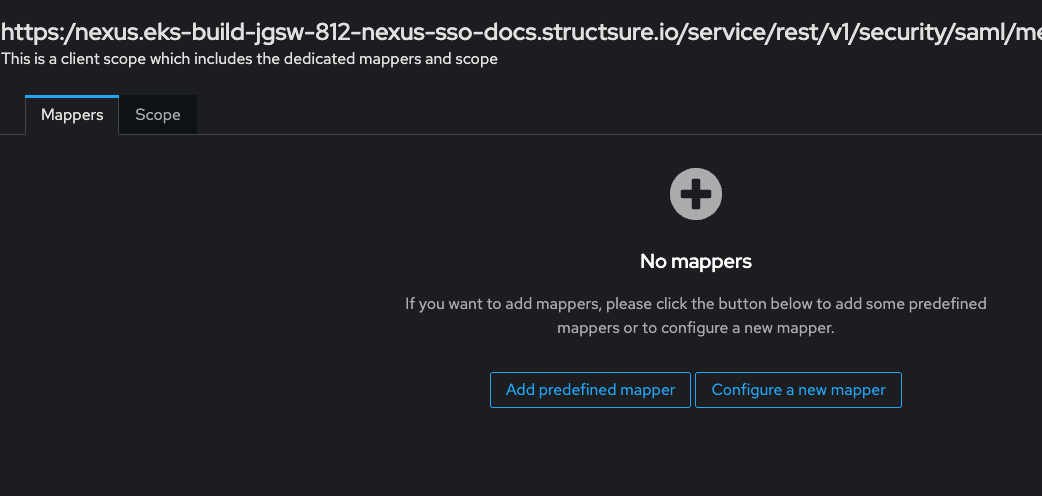
.b. Next, a new screen will appear where mappers can be added directly. Select "Configure A New Mapper" and then select "User Property" as the type of Mapper, as shown here:
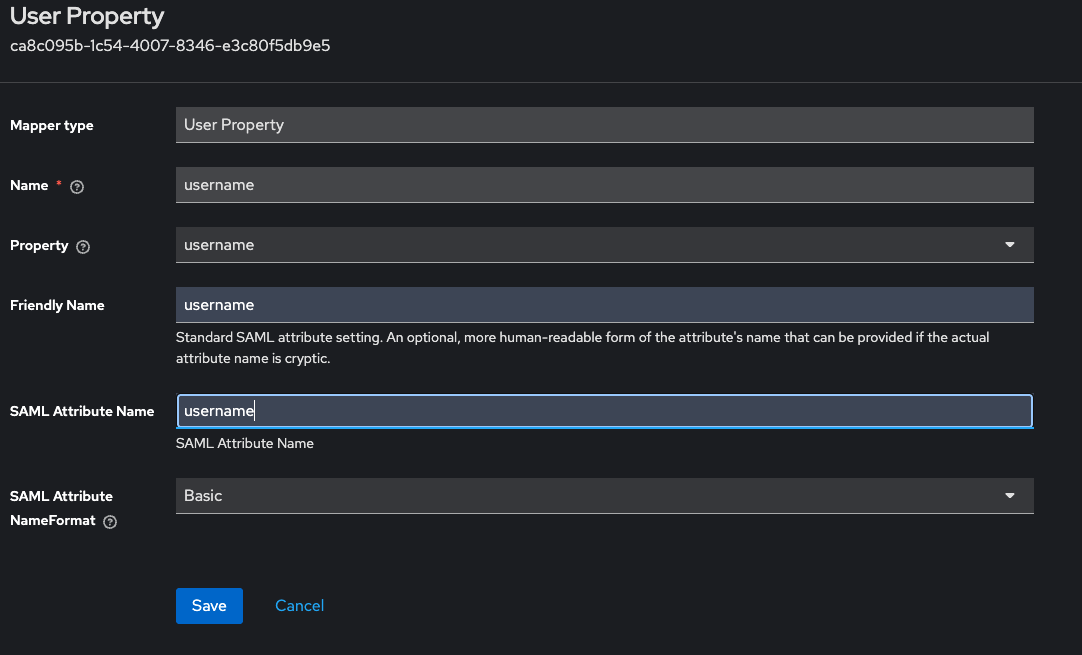
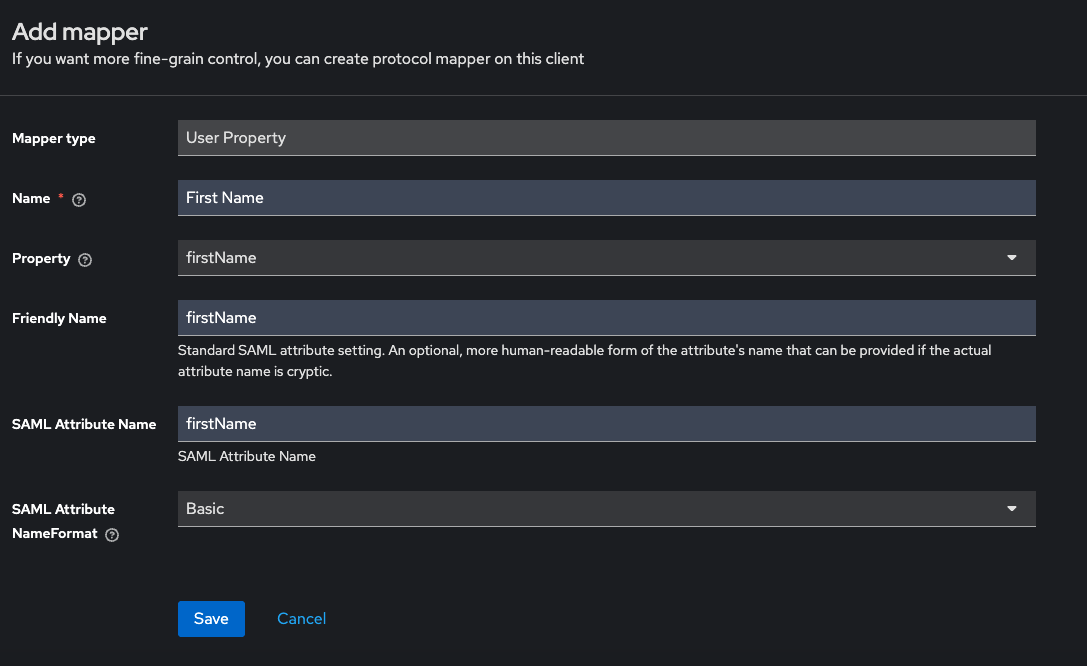
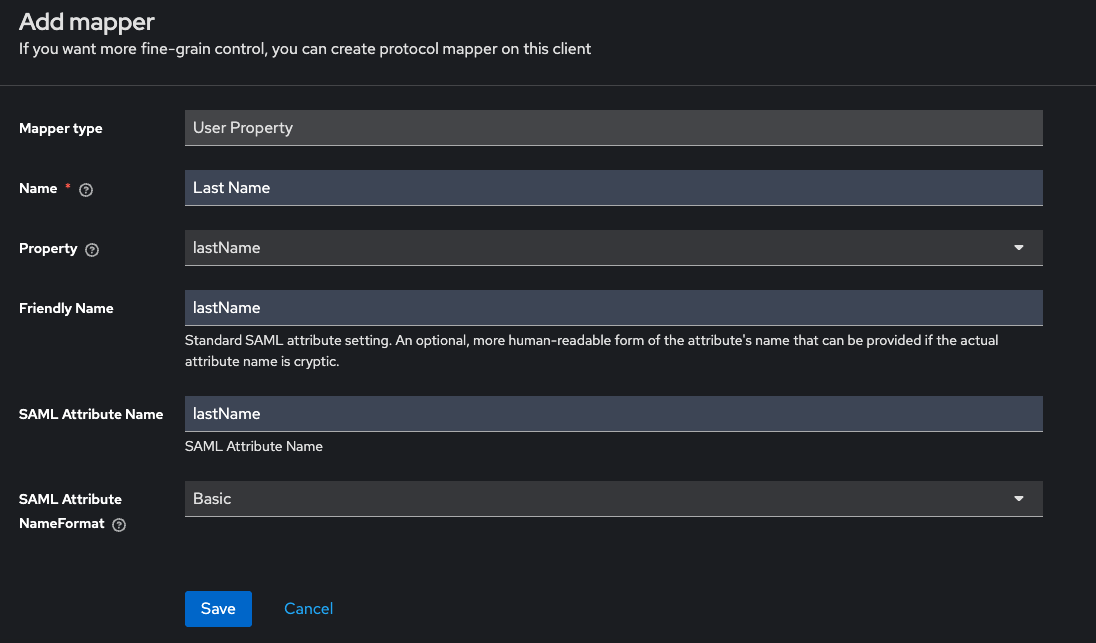
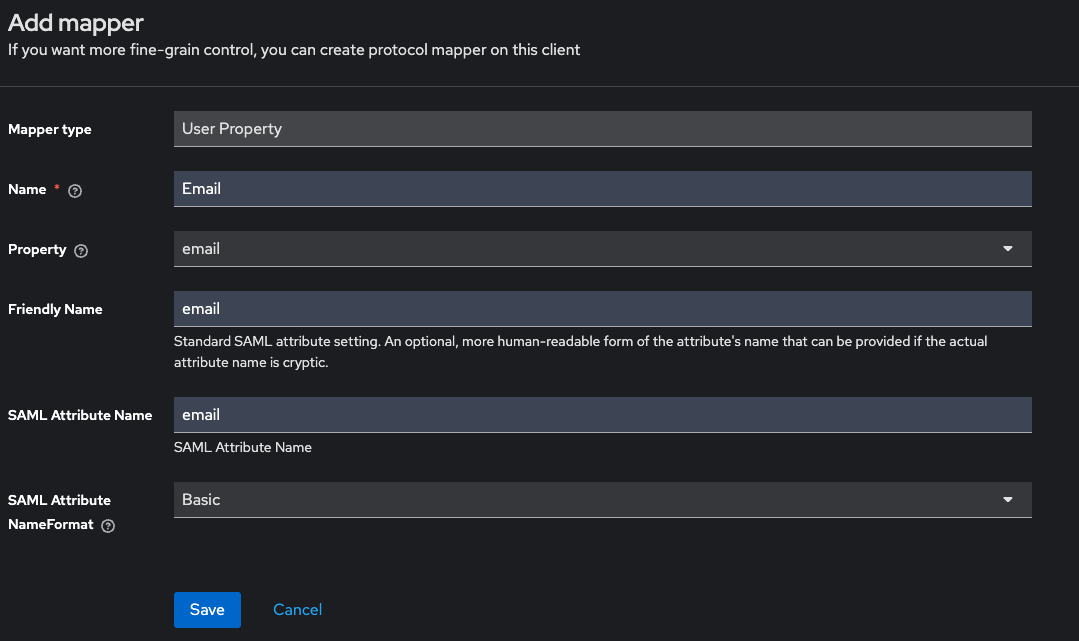
c. Fill in the user mappers as shown in the following screenshots:
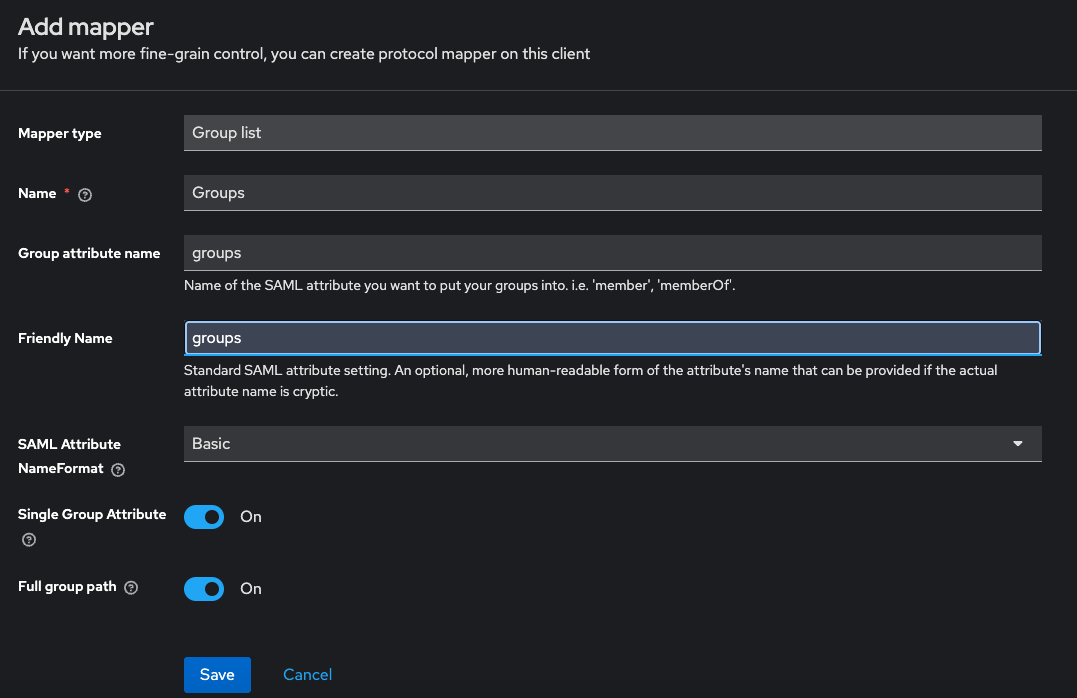
d. The "groups" mapper should have type "Group List" as shown:
e. This screenshot shows the UI with the mappers created:
-
Once the mappers are complete, check the "FINAL NOTE" of the Big Bang Instructions for confirmation if your Nexus x509 certificate needs to be updated in the Keycloak client.
Congratulations! You have successfully configured Nexus Repository Manager for SSO.